Migrating from cloud to cloud, what you want to learn before you start
Moving 40 applications from one cloud to another cloud is not always easy. We learned this by migrating from Azure to AWS. Our handicap: we had to partially build the migration tools ourselves. Discover what we learned from this assignment and the best approach, from what we know today, when moving from Azure to AWS.
Why migrate one cloud to another?
Ok, first the elephant in the room. Why migrate from cloud to cloud if it is such a hard task? After all, most companies are just starting to migrate from on-premise to the cloud. Unfortunately, if you were one of the early adopters of the cloud, a lot has changed. All cloud providers that made it before to our client’s shortlist have reinvented themselves; each in their own way. This makes “cloud hopping” - as some call it - beneficial for many reasons:
- It optimizes cloud costs through clever resource usage
- It reduces dependency on one cloud provider
- It can provide better service with regards to pricing and service level agreements (SLA's)
- It helps facilitate company mergers with other companies that use other clouds
For our client, the main reasons for migration were cost optimization and being less dependent on one provider.
“The biggest difference between on-premise to cloud and cloud to cloud migration is the technical side"
Challenge: no impact on runtime
The lack of any complete out-of-the-box migration tool was one thing.
In addition, we faced another challenge: business continuity. It was the biggest priority for our client. This meant all applications should run all the time. Downtime was strictly limited to small maintenance windows during weekends, to keep the impact for end-users as small as possible.
Hence - functional improvements on the application were out of scope, unless there were some quick wins in cost; for example, reducing the size of the volumes or databases.
So, how do you make sure to deliver such a project?
We approached this by dividing responsibilities and making them clear for all involved parties. Some examples:
- Our cloud engineers were responsible for the migration
- The application owner was responsible for planning sign-offs, for any application configuration changes after the migration, and for testing the application after migration
- The network team was responsible for changing the application endpoints and doing the final switch-over to the migrated application
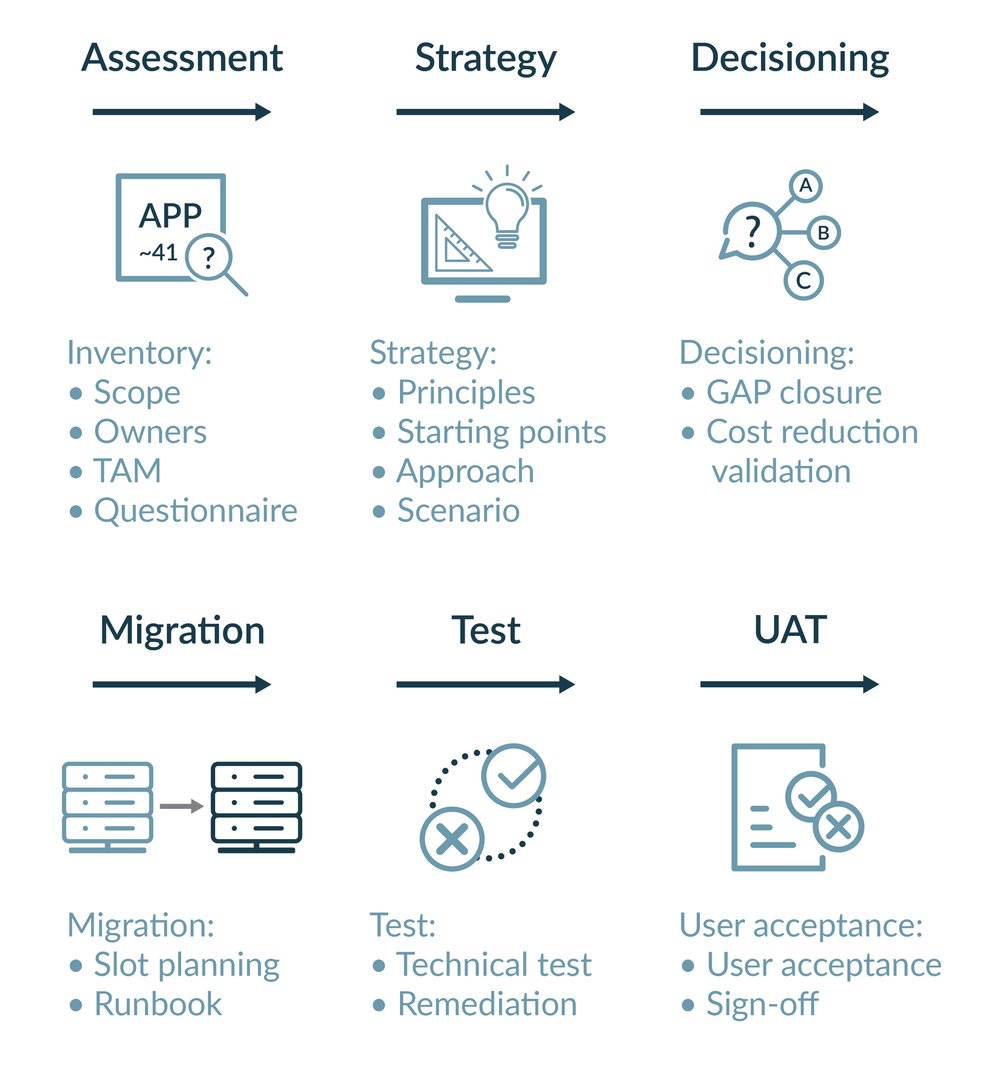
But more importantly: we followed below migration cycle (a factory approach).

For each application we followed this migration cycle.
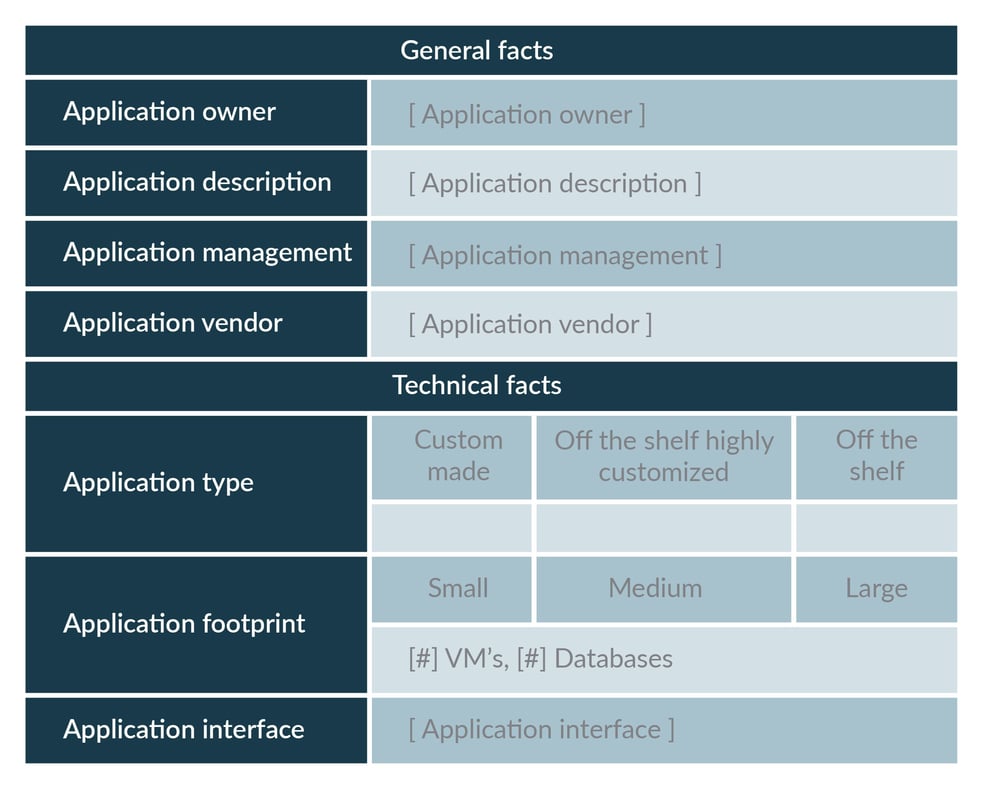
It always starts with an assessment (see below form). We sit with each application owner and technical application manager, and take the time to talk about what the application does and what the interfaces are to the client’s network, and to other third-party tools. Together with the application owner we then decide which migration approach would fit the application best and what potential gaps we would need to close.
Assessment with a simple form
Strategy: define the migration approach
Choose any of the below migration approaches:
- Lift and shift migration
- Application redeployment, application re-installation and data migration
- Application redeployment and application re-installation
As a starting point, we were advised to go for the second migration approach, since this would result in the least down time. However, the application owners decided to go for the lift and shift method. This was mainly because the application documentation wasn’t always as crisp and clear as they hoped it was. The application was also installed by external parties, meaning reinstalling it would have become a time-consuming task for the application owner.
After deciding on the lift and shift strategy, we worked closely with the application owners. We organised multiple sessions to see how each application worked and since lift and shift comes with down time, we asked questions like: “Do we need a maintenance window for this application migration?”, “Can we do the migration during business hours?", “Are there existing maintenance windows we could use?” and “What is the best way to go live?”
When all decisions were made, it was time to plan and create the runbook with all the dependencies and parts to import. As you might notice, the starting point for a cloud to cloud migration is basically the same as for on-premise to cloud. The biggest difference is on the technical side.
“I had to rewrite the default migration scripting.”
Real world migrating
Around 40 applications were selected to migrate to AWS. These applications were mainly built on Virtual Machines. That is why we focused on automating the Virtual Machines migration from Azure to AWS. There wasn’t an out-of-the-box tool available at that moment. However, by working closely with AWS, we were able to speed up the process. AWS provided us with input and examples on how to deal with VM migrations. Unfortunately, due to network specifics, some custom work was still required to automate the migration.
Our lift and shift migration consisted of three steps:
- Converting the Azure application infrastructure (written in ARM) to AWS Infra-as-code (CloudFormation)
- Running the migration pipeline with the parameters of the application
- Deploying the CloudFormation template with the new Amazon Machine Image (AMI) and data volumes via the deployment pipeline
Converting the Azure application infrastructure (written in ARM) to AWS CloudFormation
This step could be prepared before or during the actual migration. Because we use a catalog way of deploying resources in the cloud, translating the Azure ARM code to AWS CloudFormation was relatively easy. It was as simple as picking a similar catalog item from the other cloud provider. During this stage, we didn’t pay attention to rightsizing or changing the infrastructure architecture. Instead we focused on getting the application up and running on the new cloud provider.
Running the automation pipeline with the parameters of the Virtual Machines to migrate
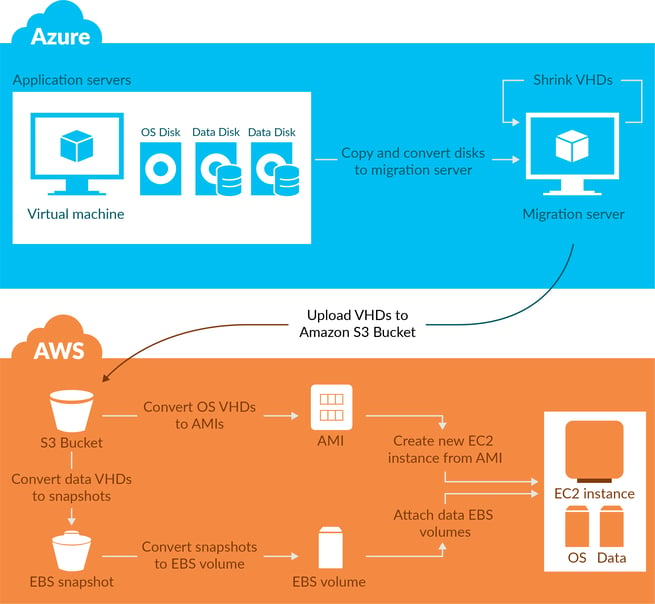
With help and input from AWS, we created the pipeline (see figure below) to do the actual migration. I will highlight the most important steps:
- Turn off the virtual machines to prevent changes during the lift and shift migration
- Convert the OS + Data disks to VHDs and copy them to a temporary migration server
- Optionally, the VHDs could be shrunk to save time during the next copy step
- Upload the VHDs from the migration server in Azure to an AWS S3 Bucket
- Conversion
- Convert the Operating System disk VHD to an Amazon Machine Image (AMI
- Convert the data disks to EBS Snapshots
- Convert the EBS Snapshots to EBS Volumes
- Fill the CloudFormation Template with the new AMI and EBS parameters
Deploy the CloudFormation template to create the new application resources

“1 terabyte? We can migrate that in two to maybe three hours. Let's say four to be sure”
Lessons Learned
So, now you know how we did it.
What are the takeaways when you do a cloud to cloud migration? These are the lessons learned from this project:
- Lift and shift was the most popular method with the application owners
Even though the second migration approach (greenfield app deployment, reinstall of application and data sync) would have had practically no downtime, the lift and shift migration approach was more popular; likely because this approach would require less effort from the (technical) application owners - Reserve enough time for data migration
API speed fluctuation at the different cloud providers could take an hour of extra time with larger data disks - Azure and AWS specifics can impact the migration
For example, a specific kernel version for Azure virtual machines wasn’t recognized by AWS - PaaS components don’t migrate easily in infrastructures with proxies
Most of the existing migration tools are using a virtual machine to transfer data from one PaaS component to another PaaS component. When working in an environment with strict internet access, this way of migrating could cause errors - Reserve enough time with the application owners
This is to make sure they understand the urgency of the migration so everyone else involved commits to achieve the goal - Shrinking only makes sense if only a small part of the disk is used
Shrinking a close-to-full disk takes a lot of time. It’s better to download it immediately - Application intakes can be complicated
Especially if specific knowledge gets lost when application owners change - Work closely with the cloud provider
(AWS in this case) to increase speed and solve complications that arise during a migration - Sometimes you have bad luck
You can’t predict that a couple days after you finish your last migration, AWS officially releases their Server Migration Service (SMS) tool…
When problems occur, keep agile
Even after planning every step of the migration (requesting change windows during- or after office-hours, and working together with the technical application owners), it’s not always possible to prevent issues from happening. For example, during some migrations problems occurred amid booting the migrated virtual machines. Being agile and in close contact with the project managers, technical application owners and the support team from AWS, we were able to come up with solutions for most of the issues.
Unfortunately, in a couple of situations the migration windows for the application were too limited and we had to perform a rollback to keep user impact to a minimum. At that moment it seemed like a big waste of time. But it was actually very helpful for us and the application owners because it gave us more insight in what the application was actually doing and how it was behaving on the OS. This new information helped in re-planning a new migration and helped to make it successful.
So in summary, a successful migration follows these steps: define the why, know your limitations, assess the situation, use a standard approach; then start, face the issues you encounter and handle them in an agile way.


