
Kubernetes is a container orchestration tool, also called k8s. It was created in 2014 by Google and handed over to the Cloud Native Foundation after v1.0 was finalized. It has been growing ever since. We haven’t gotten to play with Kubernetes yet within our Itility Stack Community , so it was time I treated myself to a deep dive. In this blog I share my findings.
The Kubernetes tool makes it possible to deploy container applications on any cloud and manage them the way you want. It is the ideal platform for deploying applications based on a microservices architecture. This is interesting – as many companies are looking into using containers to deploy software more efficiently and speed up their development teams.
My Kubernetes journey
Together with a friend, I spent many weekends exploring Kubernetes and Linux. When we started, we both had a lot of experience with Virtual Machine technology, but containers were new to us and we were still discovering the intricacies of working with Linux.
In the beginning, installing Kubernetes was a challenge in and of itself. There are many configurations to choose from, and lots of different ways to install them. After a few weekends, we began to understand more and slowly started to use the automating tools, but the network and storage are still challenging. Especially when you do them on VMs in a self-hosted Linux environment, which I have at home.
My Linux stack
I used my basic desktop computer, which has lots of RAM and some fast storage as my “server”. It has a Ryzen gen1 processor with 32gb of RAM and a fast SSD on M2. It runs Proxmox, an opensource virtualization environment based on KVM. This runs VMs like what you would find in vCenter.
One of the VMs running on my computer is a Gitlab server that stores code, documents everything and runs CI/CD pipelines. There is also a Puppet server which configures all VMs to desired state after initial deployment, using a Gitlab CI/CD pipeline.
The Kuberenetes cluster runs on 4 CentOS7 VMs and is deployed using Kubespray. Kubespray is a Github project that uses Ansible to automatically deploy Kubernetes on a variety of systems.
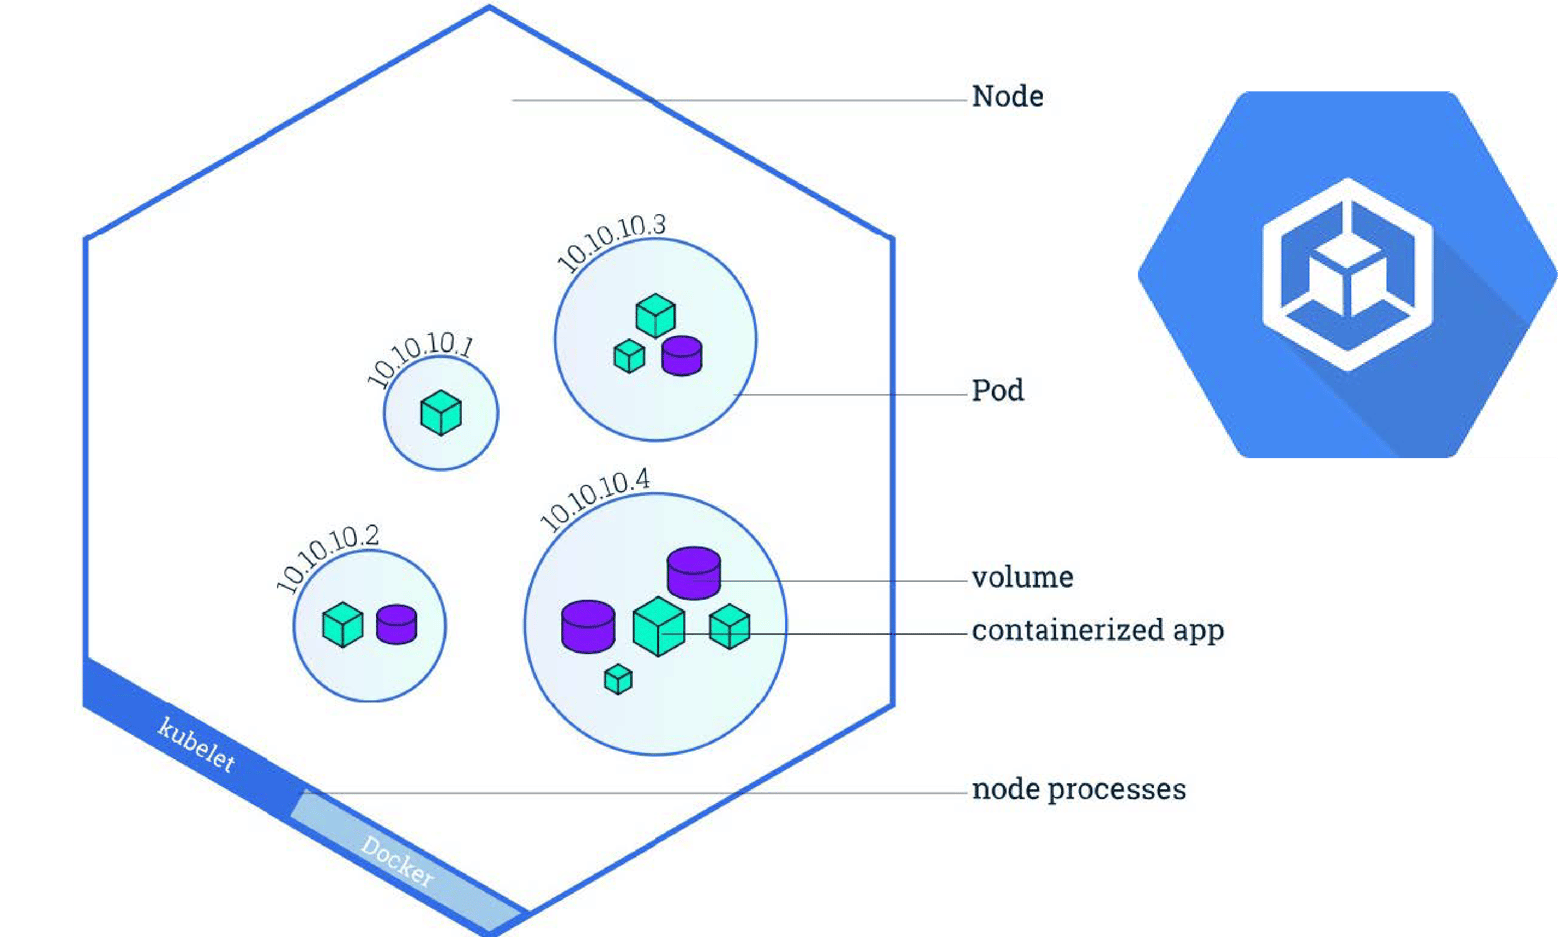 Representation of a Kubernetes Node
How Kubernetes works
First a bit about Kubernetes. It is a container orchestration tool that can deploy container images from a container registry. It adds capabilities like service, storage orchestration, automated rollouts and rollbacks, self-healing and secret management. Together this creates an enterprise-level tool for the creation and management of containers.
For example, if there is a WordPress application that communicates with a database service in a different container, you can create a configuration file declaring the services you want, how they interact and how to make a deployment of those. Once the application runs, Kubernetes takes care of scaling, failover, load balancing and much more.
The Kubernetes pod
A pod is a group of containers with shared storage, network and namespaces that are isolated together. Pods are ephemeral entities, meaning that when a pod is terminated it can’t be brought back, and has to be recreated. This means you must think about how to store your data. Because if for example, your storage is also ephemeral it will be deleted too when the pod gets terminated. Later in this blog I will dive into storage and explain how to create persistent storage to make sure your data is safe.
Helm; flexible configuration
Kubernetes is configured to use Helm for easy deployment of applications using Helm configuration files. Although Kubernetes can deploy containers and objects with kubectl using YAML files, this can be rather complex, as you need to setup all objects and configure how they work together.
That’s where Helm comes in. It can deploy complete sets of containers and objects packaged as charts. This makes it possible to use standard preconfigured charts, customize them, and then deploy the applications.
Helm itself is a command line tool that uses a container called Tiller to communicate with your Kubernetes cluster. Using the helm command feature, you can easily deploy preconfigured charts from the helm repository with 1 single command. Later, you can manage their lifecycle or delete the deployment.
Custom config files
Let me show you the simplicity of helm, even if you want to add some custom configuration. The first thing you do is inspect the chart by typing:
helm inspect values stable/mariadb
Now you can tweak the config .yaml file and lookup all the options, like extra persistent storage. In the example below we enable persistent storage to use a persistent volume claim that was pre-made specially for our Mariadb deployment:
persistence:
enabled: true # Enable persistence using an existing PVC
existingClaim: mariadb-pvc
mountPath: /bitnami/mariadb
Now save the file as config.yaml, and run it:
helm install -f config.yaml stable/mariadb
This makes working with Kubernetes a breeze, whether you are installing MariaDB, or even a storage service like StorageOS. Perform a helm install together with the config files that you specified, and your hard work is done
Kubernetes and StorageOS
So far I’ve described the easy part. A larger challenge starts when arranging storage in Kubernetes. If you deploy your Kubernetes on Google Cloud, you’ll get a StorageClass out of the box. Within minutes you can use it.
A Storage Class can be used to create a piece of persistent storage by making a PVC (Persistent Volume Claim) with the StorageClass name in it. The StorageClass then automatically creates a PV (Persistent Volume) that provides the storage and makes sure the data is preserved when a container is terminated.

But, if you deploy Kubernetes outside of a big cloud provider, or on Linux VMs, there is no StorageClass available out of the box. That leaves options like a local folder, NFS storage, or iSCSI. For all of these options you need to create PVs (Persistent Volumes) and PVCs (Persistent Volume Claims) and this can become a lot of work to maintain. These are also hard to automate and can result in the loss of data if you make a mistake.
So how to make this easy? There are options to install a storage provider that provides Storage Classes on bare metal or VM Kubernetes installations. Most of them had limitations that prevented me from using them in a small home-lab. However, after trying a few options, I found that StorageOS provides a way to create Storage Classes.
StorageOS
StorageOS provides cloud native persistent software defined storage for containers. It can easily be installed using Helm and integrates with Kubernetes. StorageOS creates persistent volumes in a folder and replicates them to other nodes using a storage pool to make them highly available and extendable. StorageOS is agnostic of the underlying storage and runs on Baremetal, VMs and cloud-providers.
Unlicensed, you can use up to 100 GB of storage, and with a free developer license this can be extended up to 500 GB. Enterprise licenses come with unlimited amounts of storage.
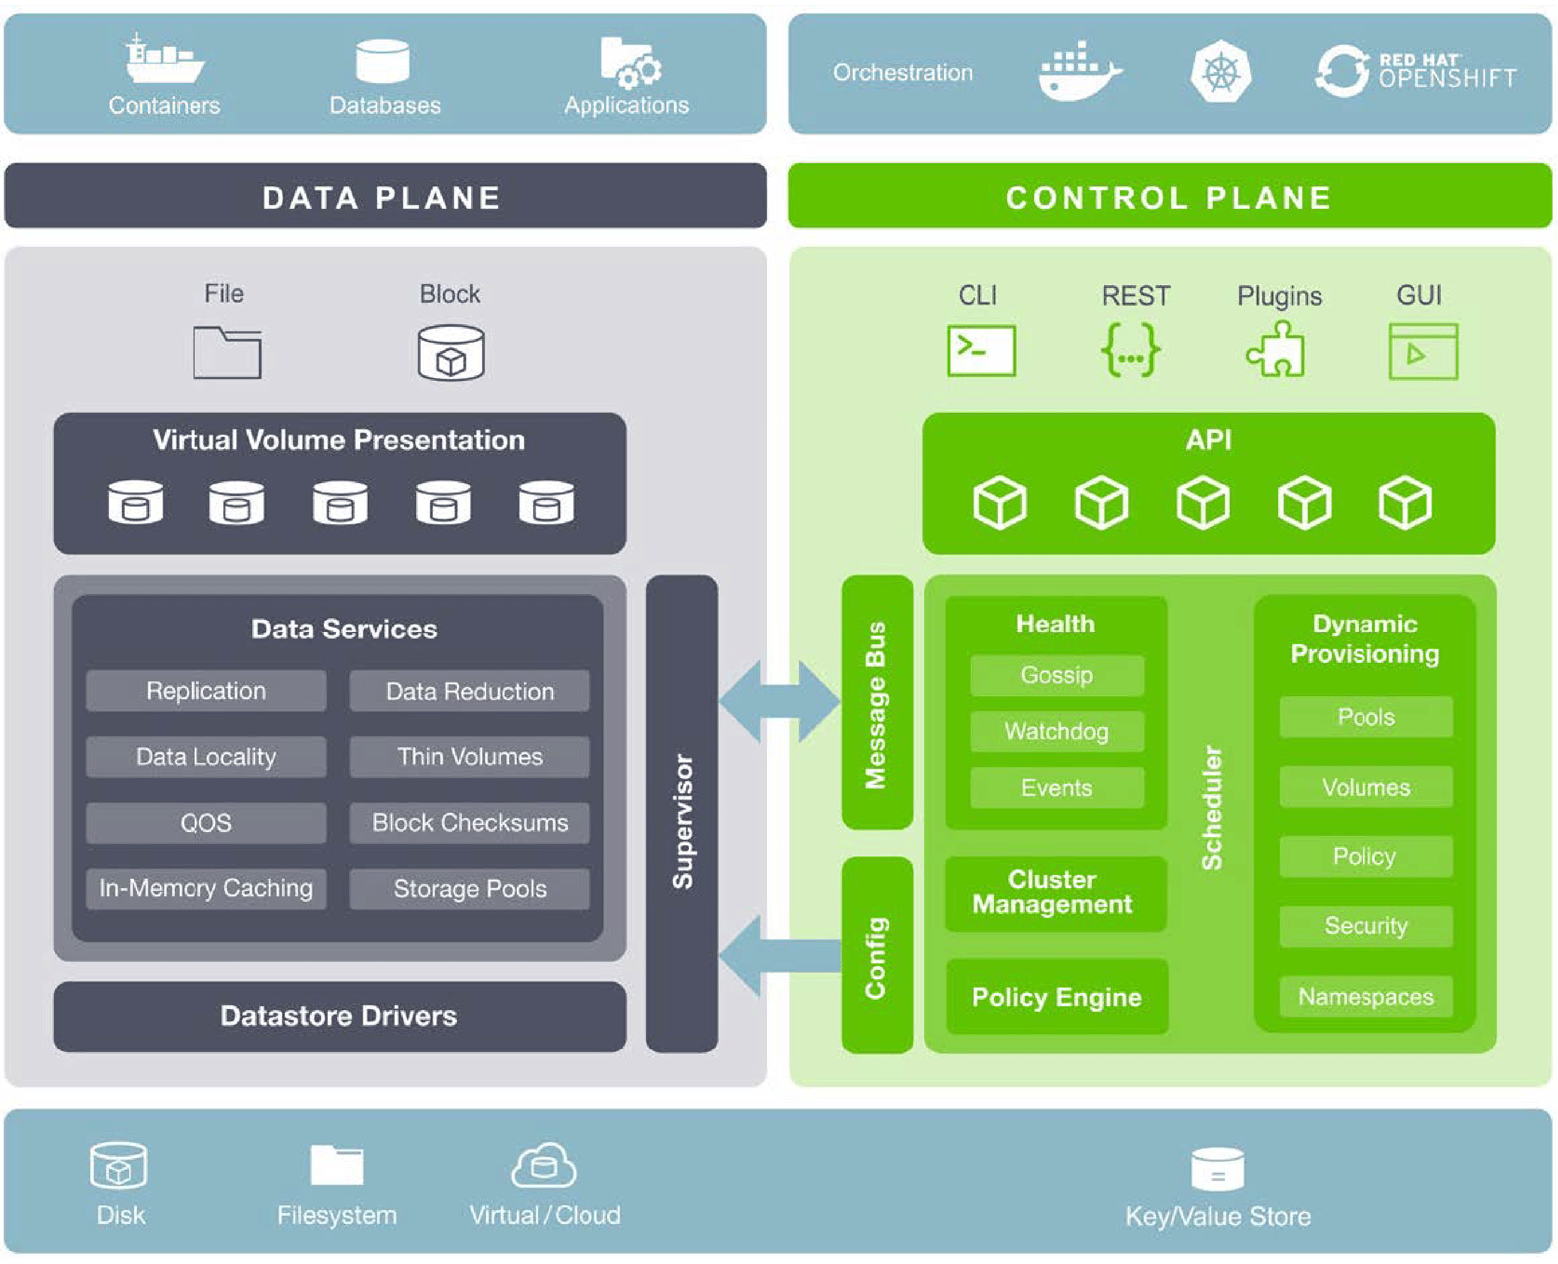 StorageOS components
StorageOS from the inside out
StorageOS deploys a DaemonSet with 1 container per Kubernetes node and storage is managed through StorageClasses or Persistent Volume Claims. StorageOS provides thinly provisioned storage that is stored on the folder /var/lib/storageos/data. It’s best to mount a separate disk device on this folder. Any container can mount StorageOS virtual volumes from any host regardless if that host already contains the volume.
StorageOS uses compression and encryption to increase performance, reduce the amount of storage used and secure the volumes. Namespaces can be used to allow multiple teams, with different projects, to use the same storage. You can also use policies to provides access to certain users.
In general, StorageOS is an easy-to-setup way to manage your storage in an automated way within Kubernetes. It can scale from a small lab all the way to a huge enterprise rollout and provides a consistent and manageable way of deploying storage for your containers.
Your first steps in Kubernetes
When I start learning a topic, I really like to know all ins and outs. Playing with the Kubernetes technology was lots of fun. At first, the technique seemed overwhelming, but when I got to know the fundamentals, I could easily see it saving lots of time and money for enterprise-scale applications. Consequently, I can say it was worth my time and I see lots of potential – so I can’t wait to introduce the technology to our customers.
Would you like to play with Kubernetes as well? This is where I started.
Click here for more articles on IT Foundation.